Private OpenVPN networking on Ubuntu 20.04 and Raspberry Pi 4
Author: Paul Sueno
Created: 8/16/2020 // Updated: 8/23/2020
Set up a private VPN using OpenVPN software on Ubuntu 20.04 LTS and Raspberry Pi 4. Light weight and cost effective security.
If you've followed along in my other tutorials, you're now familiar with setting up an Ubuntu server. But the other tutorials set up Ubuntu on the cloud. This time, we'll do it on-site with a neat little single-board computer that's been around for some time now. It's the tried and true Raspberry Pi.
But why on-site rather than on the cloud? The main reason is content. Some content providers limit access if through a cloud based VPN. But if your VPN is behind your home internet, then content is delivered to your device as if you're sitting comfortably at home.
If you choose to implement this on a cloud server. I'd recommend you set up your own server through a company like Linode, rather than using a VPN company. Though people at the public wifi may not be able to spoof your internet browsing, that VPN company now has all your data and browsing information. Even if they say they won't use it, why would you trust them?
Once you've set up your VPN, skip ahead and create a new VPN client file.
Ubuntu 20.04 on Raspberry Pi 4
First off, you have to get the Raspberry Pi 4. You can get them anwhere like at Target, Newegg, etc. There are several ways to install Ubuntu 20.04 LTS on Raspberry Pi 4. The Imager method didn't work for me. The PC I used to set up the SD Card was Ubuntu Desktop with the standard Gnome environment. The Raspberry Pi Foundation recommends a Class 6 micro SD card. Searching Newegg there were more choices when I included Class 6 and Class 10 (or UHS-I or U1). What worked is the following.
Go to the official Ubuntu on Raspberry Pi download page. I downloaded Ubuntu 20.04 for Raspberry Pi 4 - 64-bit. Note where you downloaded the file.
Insert the micro SD card into your PC. Assuming you are running Ubuntu Desktop on your PC, run the program Disks. Select your SD card on the left panel. Click on the vertical ... up top next to the minimize button. Click on Restore Disk Image.... Click on (None) next to Image to Restore. Select the file you downloaded above. Click on Start Restoring.... For Windows, it might be easier to use the Raspberry Pi Imager but it didn't work for me with a Linux PC.
The official Ubuntu installation documentation talks about headless server install through wifi. Because I want to minimize risk of VPN failure, I will connect the Raspberry Pi 4 to the network by cable and not use wifi. Moreover, the Ubuntu official documentation for headless wifi set up just plain didn't work for me. If you want to use wifi, I leave it to you to figure these steps out yourself.
Unmount the SD drive, remove it from the PC and place it in the Raspberry Pi 4. Plug in the micro HDMI cord connected to a monitor, a keyboard into the USB and network cable into the ethernet port. Now plug in the USB-C power source.
Initial Ubuntu VPN login and settings
The initial login is ubuntu for both username and password. You may have to wait a minute before the OpenSSH keys are created for the OS. It took a while for mine. I don't know why. After the first log in, it will ask you to create a different password. Remember this!!
Let's update and upgrade Ubuntu by running sudo apt update && sudo apt upgrade. Create your own user, and be sure to replace username with your own.
sudo adduser usernameAdd the new username to group sudo. This will allow you to do root/sudo commands. Again, be sure to replace username with your own.
sudo usermod -a -G sudo usernameLog out as ubuntu by running the command exit. Login as your new username. Delete the ubuntu user by running the following command.
sudo userdel ubuntuYou may want to change your timezone to the one your are in physically. Do this by typing sudo dpkg-reconfigure tzdata.
VPN Network Settings and Firewall
Here are some basic assumptions for network name (FQDN) and addresses. Please substitute your own where appropriate. The addresses here are made up but will be used consistently throughout. The ports are accurate. I will set up two VPN's in case one is blocked for whatever reason; but this is for another tutorial. We'll start with one for now. To minimize risk of blocking, we will use standard HTTP/HTTPS ports.
- You do not want or need to host a web server from home
- Public FQDN (WAN) pointing to home router: router.publicdomain.com
- Private FQDN (LAN) pointing to home router: router.private.home
- Private FQDN (LAN) pointing to Raspberry Pi VPN: vpn.private.home
- Public IP address assigned to the house: 24.0.0.256
- Private home router LAN IP address: 192.168.146.1
- Private Raspberry Pi VPN LAN IP address: 192.168.146.11
- Router port 80 will forward to VPN port 80 (why you can't host a web server)
- Router port 443 will forward to VPN port 443 (why you can't host a web server)
- Router port 50022 will forward to VPN port 22
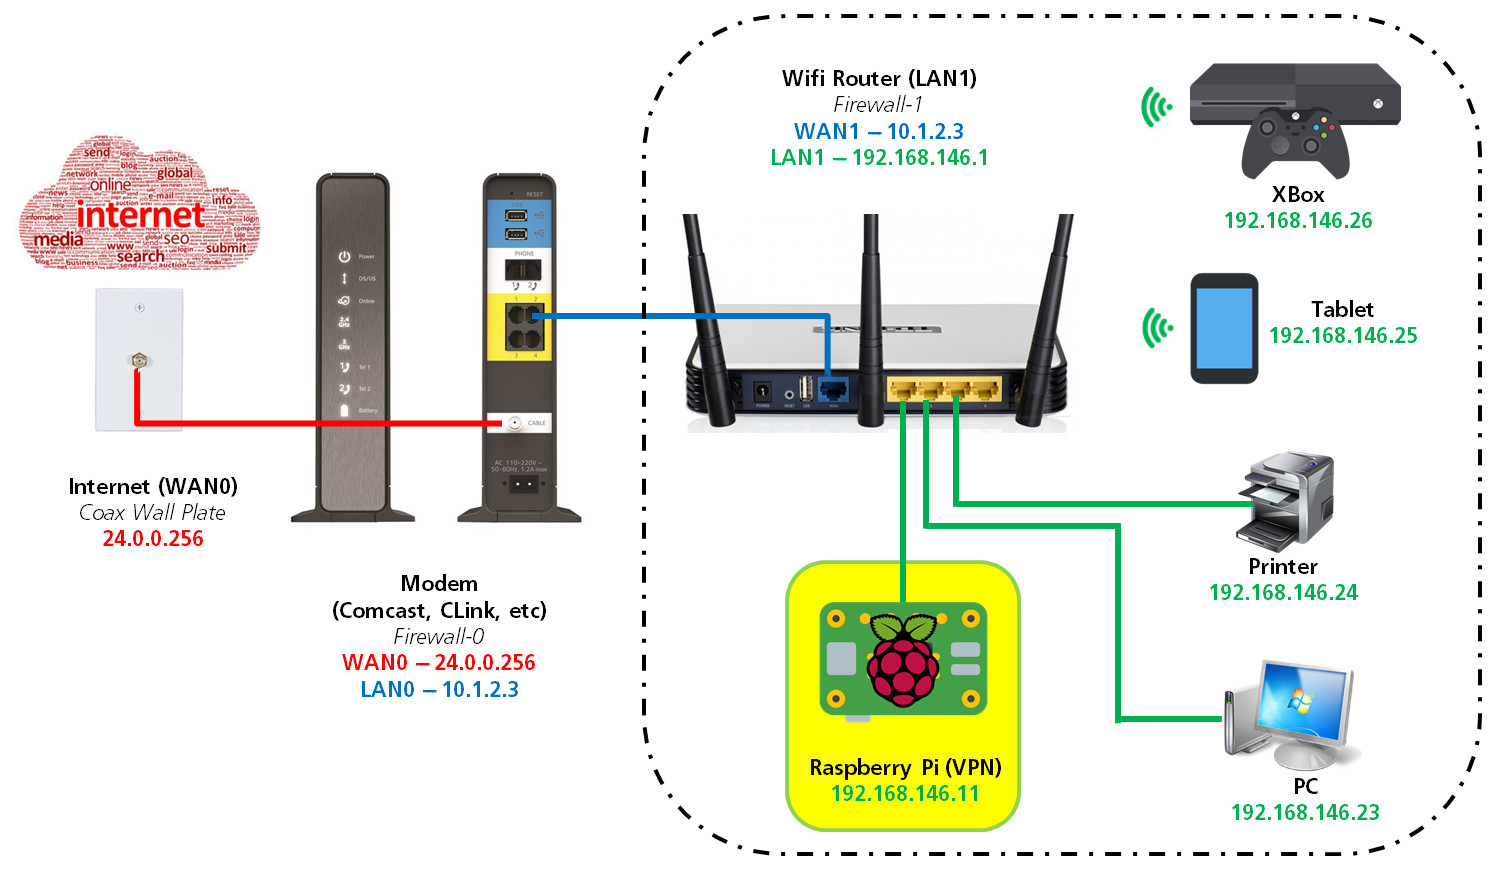
The VPN will be a host in my router's local area network (LAN). I made this image for an older tutorial several years ago. The modem and router graphics are outdated, but the schematic still works.
The Raspberry Pi host name should be changed to conform to our settings above. Replace ubuntu with vpn in the following command.
sudo nano /etc/hostnameThe LAN IP address assigned to the Raspberry Pi VPN for this tutorial will be 192.168.146.11. Make sure whatever IP address you use is accessible on your LAN; and make sure no other host is using that IP address. Alternatively, find out what IP address your DHCP assigned to the Raspberry Pi VPN. Regardless of what address you decide on, you must use that address instead of 192.168.146.11 example I give. Also be sure to replace the tutorial's router IP addresses 24.0.0.256 and 192.168.146.1 with whatever addresses your actual router/gateway uses.
Let's make sure the IP address is static and does not change any more. Either use the address you picked above, or stick with the DHCP one. For the DHCP, get the current IP address by typing ifconfig. Look for the inet address for eth0. The network address is set up via netplan. Let's find out what configuration file we are using by typing ls /etc/netplan. Use whatever file is listed there. It's probably the same, but let's go ahead and edit the file by typing sudo nano /etc/netplan/50-cloud-init.yaml.
network:
  ethernets:
    eth0:
      addresses: [192.168.146.11/24]
      gateway4: 192.168.146.1
      nameservers:
        addresses: [192.168.146.1]
  version: 2
My netplan configuration file had some tips on preventing this file from being overwritten. If you don't see this in your configuration file, then just ignore it. It says to create the file by typing sudo nano /etc/cloud/cloud.cfg.d/99-disable-network-config.cfg.
network: {config: disabled}Load up the new settings by typing sudo netplan apply. Now that we have a static IP address, let's tell our VPN server it's okay to forward network traffic from one device (eth0 - ethernet cable) to another (tun0 - OpenVPN tunnel). Let's edit a configuration file by typing sudo nano /etc/sysctl.conf.
Uncomment around line 28: net.ipv4.ip_forward=1The file has to be reloaded by typing sudo sysctl -p.
Now let's do the firewall for our VPN. The only outside traffic we want additional to a basic set up are 80, 443 and 22. I don't use the default firewall ufw. Instead, I prefer the granular controllability allowed with iptables. The basic template of my iptables is based on the github examples by @jirutka.
The following steps will turn off and disable ufw. Then download a service that allows the iptables rules be saved and reloaded correctly, when the server is reboot or shutdown. OK to save current iptables when prompted.
sudo service ufw stop
sudo systemctl disable ufw.service
sudo apt install iptables-persistent
Copy-paste the iptables rules by @jirutka to a text editor. Modify any lines that you may want. If you don't need ipv6, then turn it off in Ubuntu. Look into this tutorial by linuxbabe. Now copy-paste these modified rules files to /etc/iptables/rules.v4 and /etc/iptables/rules.v6 (if using ipv6).
We have to make some edits to each file. Be sure to do it for both the v4 and v6 files.
Uncomment under section 2. HOST SPECIFIC RULES, # Accept HTTP and HTTPS:
-A INPUT -p tcp -m multiport --dports 80,443 --syn -m conntrack --ctstate NEW -j ACCEPT
Add immediately below this line:
# Allow forwarded traffic that have been established
-A FORWARD -i eth0 -m state --state ESTABLISHED,RELATED -j ACCEPT
-A FORWARD -i tun0 -j ACCEPT
Near the bottom, uncomment the NAT lines:
*nat
# Base policy
:PREROUTING ACCEPT [0:0]
:POSTROUTING ACCEPT [0:0]
:OUTPUT ACCEPT [0:0]
# Public VPN traffic masquerades as LAN traffic
-A POSTROUTING -o eth0 -j MASQUERADE
COMMIT
In case you happen to use the command sudo iptables-save, make sure you save the formatted rules files. That way you have them as reference. Otherwise, the command saves the iptables without any formatting.
sudo cp /etc/iptables/rules.v4 /etc/iptables/rules.v4.formatted
sudo cp /etc/iptables/rules.v6 /etc/iptables/rules.v6.formatted
At this juncture, we can make the server headless. Be sure to logout by typing exit, and then unplug the HDMI and keyboard cables. If you don't do this, somebody visiting your home can plug in and potentially do very bad things. Alternatively, you can type in the command shutdown now, unplug everything and then plug in just the ethernet and power cables. You can now access your Raspberry Pi VPN through a remote terminal by typing ssh [username]@[ip address] (substitute your own values for [username] and [ip address]) on your LAN.
Router and DNS Settings
I don't have a dedicated IP address through my home internet service provider. I don't want to remember a numerical address, and so I use Dynamic DNS. This service updates my DNS registrar with my home IP address; so that when I access my WAN FQDN it points to my home network. With our assumptions/settings above, I would log into my domain registrar (e.g., Namecheap) and set up Dynamic DNS on the domain registrar server. I then set up a dynamic DNS client (ddclient) on my router. It's beyond the scope of this tutorial, but go Bing it to find out more. Read more here if you also use Namecheap Dynamic DNS with ddclient.
I set up a forwarding Bind9 DNS server on my home router. This DNS server forwards requests to my caching Bind9 DNS server on the cloud. To make my VPN host accessible by FQDN on my LAN, I need to create an A RECORD on my home router's DNS. Using a separate terminal accessing your router.private.home, update the router's Bind9 DNS db file by typing sudo nano /var/cache/bind/router.private.home. Your file will be different. Make sure you edit your correct file and use your own LAN host and domain names. This is optional. You can always refer to your VPN by IP address.
$TTL 1d
$ORIGIN private.home.
@          IN SOA rtr root (
                  2020081601 ; serial number, eg, yymmddXX
                  12h ; refresh
                  15m ; retry
                  3w ; expire
                  3h ; neg domain ttl
           )
@          IN A   192.168.146.1
@          IN NS  router
router     IN A   192.168.146.1
vpn        IN A   192.168.146.11
After updating your router's DNS entries, reload the service by typing in the router terminal sudo service bind9 reload for Ubuntu 18 or sudo service named reload for Ubuntu 20. Test it out by typing ping vpn.private.home. If you happen to change or update these A RECORDS, you'll have to remember to update the serial number and flush the DNS cache by typing sudo systemd-resolve --flush-caches.
Router Port Forwarding
Whenever traffic is sent from the world-wide-web to our public IP address, we want to make sure the VPN picks up the correct signals. Some public wifi put extreme restrictions on which ports they allow. Some businesses also restrict whether UDP is even allowed on some ports. To ensure we minimize the risk of public wifi blocking our traffic, we will mimic regular http or https website traffic. In other words, we will use TCP ports 80 and 443. Unfortunately, you will not be able to host a standard web server from home.
You will need to login to your router. Bing search your router model and port forwarding. You follow the proprietary guides for off-the-shelf routers. The rest of this section on port forwarding will be based on a custom built one. If you're all set with the proprietary port forwarding, then skip to the next section (Harden VPN SSH server).
My network has Ubuntu installed on the router. And so it should already be set up to forward IPv4 traffic. If you have an Ubuntu based router with IPv4 forwarding set up already, then we need to update our iptables to accomplish port forwarding.
Open a terminal and ssh into router.private.home. Make a back up of your iptables by typing sudo cp /etc/iptables/rules.v4 /etc/iptables/rules.v4.bak. Let's edit the file by typing sudo nano /etc/iptables/rules.v4.
Be sure the following lines are in the file. How it is organized is also important. You can add the -A FORWARD lines with all the other FORWARD chains. Be sure the lines with -A PREROUTING and -A POSTROUTING are after the : (colon) entries under *nat. The lines below are not a complete file. Do not just copy-paste this as your actual file. Your router will break. There are three sets of lines each for ports 80, 443 and 50022->22.
-A FORWARD -p tcp -d 192.168.146.11 --dport 80 -m state --state NEW,ESTABLISHED,RELATED -j ACCEPT
-A FORWARD -p tcp -d 192.168.146.11 --dport 443 -m state --state NEW,ESTABLISHED,RELATED -j ACCEPT
-A FORWARD -p tcp -d 192.168.146.11 --dport 22 -m state --state NEW,ESTABLISHED,RELATED -j ACCEPT
-A PREROUTING -p tcp --dport 80 -j DNAT --to-destination 192.168.146.11:80
-A PREROUTING -p tcp --dport 443 -j DNAT --to-destination 192.168.146.11:443
-A PREROUTING -p tcp --dport 50022 -j DNAT --to-destination 192.168.146.11:22-A POSTROUTING -p tcp -d 192.168.146.11 --dport 80 -j SNAT --to-source 192.168.146.1
-A POSTROUTING -p tcp -d 192.168.146.11 --dport 443 -j SNAT --to-source 192.168.146.1
-A POSTROUTING -p tcp -d 192.168.146.11 --dport 22 -j SNAT --to-source 192.168.146.1While still in the router.private.home terminal, let's load the new iptables rule by typing sudo iptables-restore</etc/iptables/rules.v4.
Harden VPN SSH server
If you chose to modify your router's DNS records to include vpn.private.home, you can now access your Raspberry Pi VPN through the LAN by typing ssh [username]@vpn.private.home rather than using the IP address. If you chose to do Dynamic DNS and set up port forwarding correctly, you can also access it through the world wide web by typing ssh [username]@router.publicdomain.com -p 50022. Now go ahead and get back into a Raspberry Pi VPN terminal. Let's make sure only the users who have certificates get access to our server. Let's back up the configuration file.
sudo cp /etc/ssh/sshd_config /etc/ssh/sshd_config.bak
sudo nano /etc/ssh/sshd_config
In the nano editor, add the following lines to the top. For [username] type in your own username.
PasswordAuthentication no
AllowUsers [username]
PubkeyAuthentication yes
PermitRootLogin no
Now that the ssh server daemon knows only you have access, let's restart the service. We'll also create a read-only folder and file for our SSH keys.
sudo service ssh restart
mkdir ~/.ssh
touch ~/.ssh/authorized_keys
chmod 700 ~/.ssh
chmod 600 ~/.ssh/authorized_keys
To create a ssh key, there are two basic methods I use: (1) Linux way and (2) Windows way. The Windows way is through the Putty and its keygen programs. I leave it to you to explore this option yourself.
For the Linux way, make sure you are on your local (laptop or desktop) device. At your $ command prompt, type ssh-keygen. You can use the default name or type in your own, but make sure it is saved in your /home/[username]/.ssh/ directory. I use the default settings and save a password. The password is optional. I will assume you didn't change the default name, and a key-pair named id_rsa was created. If you will be doing ssh to multiple remote servers/hosts, then I recommend creating a unique name for each.
Now we need to get the key we just created for the local machine readable to the remote (Raspberry Pi VPN) host. Use the command at your local (laptop or desktop) device $ prompt: ssh-copy-id -i /home/[username]/.ssh/id_rsa [username]@vpn.private.home. Be sure to substitute your username inside the square brackets. Alternatively, you can copy the contents of the local /home/[username]/.ssh/id_rsa.pub (via nano or cat) and paste it in the remote (Raspberry Pi VPN) /home/[username]/.ssh/authorized_keys.
Install OpenVPN and Easy RSA CA
Let's install OpenVPN with haveged entropy and easy-rsa certificates. The versions as of the original publication of the blog are OpenVPN 2.4.7 and Easy-RSA 3.0.6.
sudo apt install haveged openvpn easy-rsaWe have to create the OpenVPN certificates that we will use for authorized traffic. We will use Easy RSA for this.
make-cadir ~/openvpn-ca
cd ~/openvpn-ca
Build certificate authority.
nano varsWe want to add some elliptic curve cryptography to our certificates. Could be faster according to DigitalOcean. Add the following lines anywhere.
set_var EASYRSA_ALGO "ec"
set_var EASYRSA_DIGEST "sha512"
Now we create the Easy RSA certificate authority (CA).
./easyrsa clean-all
./easyrsa build-ca nopass
When prompted for Common Name: enter something like VPN CA. Now we build the Easy RSA server called VPN. We will also create an openvpn key.
./easyrsa build-server-full vpn nopass
openvpn --genkey --secret pki/ta.key
Let's copy some of these keys to the OpenVPN configuration folder.
cd ~/openvpn-ca/pki
sudo cp ca.crt ta.key private/ca.key private/vpn.key issued/vpn.crt /etc/openvpn/
OpenVPN Server Configuration
Before we get to the configuration, we have to figure out our server's MTU. If you stick with the default MTU, you run the risk of severely slow throughput in the VPN. Instead of 30+ Mbps, you may get 3 Mbps instead.
You must use a remote host to test your VPN server's MTU. While on the remote host, use ping to find the largest MTU. The following command is for Linux. You can search Bing for commands in Windows and Mac OS X. To find the right MTU, start with size 1500. Decrease the size by 10 (e.g., try 1490 next) if you see output like: local error: Message too long, 1 packets transmitted, 0 received, +1 errors, 100% packet loss or anything similar. Keep decreasing by 10 until you have successful transmission. Be sure to replace the actual IP address of your server in the command.
ping -M do -s 1500 -c 1 [server IP address]You've found your MTU once the output shows a successful ping. For example, 1 packets transmitted, 1 received, 0% packet loss. Use this number in the tun-mtu setting below.
We will now create the OpenVPN server configuration file. First, let's copy over the sample file as a back up. Be sure to read this file to understand what our configuration file means.
gunzip -c /usr/share/doc/openvpn/examples/sample-config-files/server.conf.gz | sudo tee /etc/openvpn/server.conf.bakNow let's create the actual configuration file by typing sudo nano /etc/openvpn/server.conf. These settings balance speed with encryption/validation overhead on the CPU. See Private Internet Access for their discussion. Also be sure to replace the MTU number above in the appropriate field.
port 80
proto tcp
dev tun
ca ca.crt
cert vpn.crt
key vpn.key  # This file should be kept secret
topology subnet
server 10.8.0.0 255.255.255.0
ifconfig-pool-persist /var/log/openvpn/ipp.txt
push "redirect-gateway def1 bypass-dhcp"
push "dhcp-option DNS 1.1.1.1"
push "dhcp-option DNS 208.67.222.222"
explicit-exit-notify 0
keepalive 10 120
tls-crypt ta.key
cipher AES-256-GCM
auth SHA256
dh none
user nobody
group nogroup
persist-key
persist-tun
tun-mtu [use MTU number above]
status /var/log/openvpn/openvpn-status.log
log /var/log/openvpn/openvpn.log
sndbuf 0
rcvbuf 0
verb 4
Let's start the service and enable it.
sudo service openvpn@server start
sudo systemctl enable openvpn@server
OpenVPN Client Configuration
Let's create a folder and basic configuration file as our template.
mkdir -p ~/client-configs/files
chmod 700 ~/client-configs/files
cp /usr/share/doc/openvpn/examples/sample-config-files/client.conf ~/client-configs/base.conf.bak
nano ~/client-configs/base.conf
Be sure to read the back up file for pointers. But go ahead and enter the lines below. Be sure to put in your own IP address or FQDN for the public IP address, rather than router.publicdomain.com.
client
dev tun
proto tcp
remote router.publicdomain.com 80
resolv-retry infinite
nobind
user nobody
group nogroup
persist-key
persist-tun
cipher AES-256-GCM
auth SHA256
key-direction 1
sndbuf 0
rcvbuf 0
verb 4

# Uncomment for Linux resolvconf DNS resolution
; script-security 2
; up /etc/openvpn/update-resolv-conf
; down /etc/openvpn/update-resolv-conf

# Uncomment for Linux systemd-resolved DNS resolution
# Be sure to run: sudo apt install openvpn-systemd-resolved
; script-security 2
; up /etc/openvpn/update-systemd-resolved
; down /etc/openvpn/update-systemd-resolved
; down-pre
; dhcp-option DOMAIN-ROUTE .
The client's certificates and keys will be concatenated together with the OpenVPN client configuration file. Let's create a bash file by typing nano ~/client-configs/make_config.sh.
#!/bin/bash
# First argument: Client identifier

CA_DIR=~/openvpn-ca/pki
CRT_DIR=~/openvpn-ca/pki/issued
KEY_DIR=~/openvpn-ca/pki/private
OUTPUT_DIR=~/client-configs/files
BASE_CONFIG=~/client-configs/base.conf

cat ${BASE_CONFIG} \
   <(echo -e '<ca>') \
   ${CA_DIR}/ca.crt \
   <(echo -e '</ca>\n<cert>') \
   ${CRT_DIR}/${1}.crt \
   <(echo -e '</cert>\n<key>') \
   ${KEY_DIR}/${1}.key \
   <(echo -e '</key>\n<tls-crypt>') \
   ${CA_DIR}/ta.key \
   <(echo -e '</tls-crypt>') \
   > ${OUTPUT_DIR}/${1}.ovpn
Make the file executable by typing chmod 700 ~/client-configs/make_config.sh.
Create VPN Client File
These are the steps to create the OpenVPN client file.
cd ~/openvpn-ca
./easyrsa build-client-full [client-name] nopass
cd ~/client-configs
./make_config.sh [client-name]
When delivering these client files to the end-user, please make sure you use secure methods. Sending it as an email attachment is not secure. It will be bounced around several servers. You put in so much effort already, all to be wasted by giving these files to these email MTA relays. I recommend delivering by private document server, USB flash drive or SFTP.
To revoke any clients, use the revoke command. I may update the tutorial to show this down the road.
VPN Client Customization
If the end-user has a Linux device, they must customize their OpenVPN file because of glitchy DNS handling. The main difference on DNS handling among Linux versions is systemd-resolved vs resolvconf. To find out, type cat /etc/resolv.conf. If you see the following line, your system uses systemd-resolved.
nameserver 127.0.0.53Be sure to UNCOMMENT the semi-colons as appropriate for Linux OpenVPN client configuration files! If your client does use systemd-resolved, then be sure to also run the following command on the client machine.
sudo apt install openvpn-systemd-resolvedThere are plenty of other tutorials out there to show you how to load OpenVPN on other clients like Windows, iOS and Android. Feel free to Bing it as well.
In the future, I want to try Tinc VPN or WireGuard; and do head-to-heads with OpenVPN. The speed is just so danged slow with OpenVPN.
- Python web app via Flask, uWSGI and Nginx reverse proxy
- Roundcube mail app and SPF, DKIM & DMARC on Ubuntu 20.04
- Install LEMP Stack on Ubuntu 18.04 LTS